 Welcome to Olli Ella!


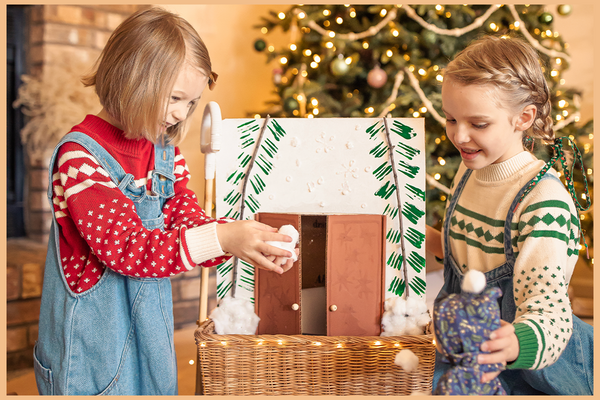
“They open the door and enter a world…” into a magical playscape for Dozys and Cozys. The best part? Kiddos will love this @raisingwildones play prop year-round.
~It’s craft time!
Make your very own DIY Narnia-inspired wardrobe

DIY Narnia-inspired wardrobe
-
 01Measure out cardboard
Measure 1 Piece of Cardboard 40cm (15.5 inches) wide by 50cm (19.5 inches) in length. Draw Lines to have cutting references. -
 02Cut
02Cut
Cut out using an Exacto knife, box cutter, or scissors. Measure from the bottom of the piece of cardboard 20cm (8 inches), mark, then continue to measure up to 32cm (12.5 inches). -
 03Measure and cut doors
Draw a vertical line connecting all the measure marks you have made. At the 32cm mark measure 13cm (5 inches) to the left, and then 13cm (5 inches) to the right. You will now have a "T" marked on your piece of cardboard. Cut the "T" mark to form your doors. Place a ruler on the edge of one door to assist in folding the door open. Repeat for the opposite side. -
 04Sponge paint background
Using a sponge paint the background white. Be sure to leave the doors unpainted. Let dry -
 05Draw your magical set
Using White glue decorate the doors. Outline, draw stars, a tree whatever your heart desires. Let dry, this make take a day to fully dry -
 06Create your Narnia forest
Collect twigs from outside or paint the trunk of the trees with brown paint. If using twigs carefully use a hot glue gun or glue to secure the piece of cardboard. Once tree trunks are in place using green paint and a fork alternating sides using the fork as a stamp to create the needles. Let Dry.
-
 07Paint doors
Using brown paint, paint the doors, you may need more than one coat. Let dry. Paint dowel rods with the same brown paint used for the doors.
-
 08Secure door
Once doors and dowel rods are dry, secure the dowel rods on the sides of the doors. Then glue the wooden beads where you would like the door knobs to be. -
 09Place snow balls
Lightly separate the cotton balls and glue them to the bottom working your way up 14cm (5.5 inches) so the snow can be visible when placed in your Wonder Wagon. -
 10Create the rest of the magical snowscape
Using glue create snowflakes, stars, circles of glue, and lines on the tree needles. While the glue is still wet, sprinkle glitter generously over the glue. Placing the piece in a container to catch the glitter gently lift it to slide and shake the glitter off. Revealing the now sparkly glue designs.
-
 11Measure and cut the back of wardrobe
You will now measure the back pieces that will create your Wardrobe for your new friends. You will have 4 pieces. Measure 1 piece 24cm (9.5 inches) wide by 32cm in length. Measure 1 piece 13cm (5 inches) wide by 24cm (9.5 inches) in length. Measure 2 pieces 13cm (5 inches) wide by 24cm (9.5 inches) in length. Cut out the 4 pieces. -
 12Assemble the back of wardrobe
Using tape place the 24cm (9.5 inches) by 32cm in the centre, and place the two 13cm by 32cm on each side. Place a piece of tape on the sides measuring 24cm vertically. Place the 13cm by 24cm (9.5 inches) piece on top of the 24cm (9.5 inches) by 32cm piece, lining up the 24cm (9.5 inches) sides. Place a piece of tape horizontally to attach. Now fold at the tape sites to form a box. Place tape on each of the corner pieces.
-
 13Assemble the whole wardrobe
Using tape you will now line up the doors and the box you have created. Place tape along all 3 sides to secure the front decorated piece with the box. -
 14Voila!
Place the Wardrobe in your Wonder Wagon and place your new friends inside! Make sure to give adequate room for the doors to open so place the Wardrobe with the back piece touching the back of the wagon.