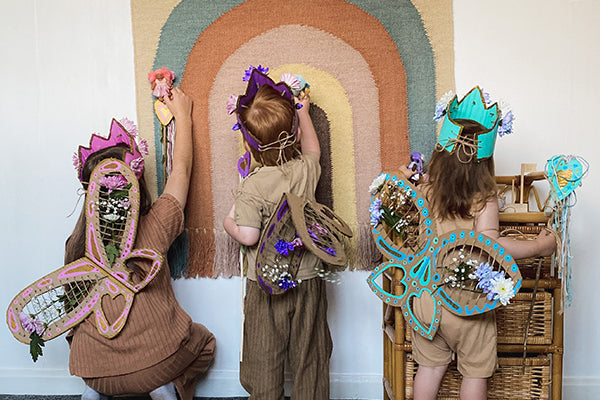
DIY | Create your very own Holdie Magical Folk Crown, Wand & Wings
Bibbidi Bobbidi Boo! We have some magical craft for you! We have teamed up with our crafty friend Jenni of @myweebuddy to create some whimsical, upcycled, DIY treasures inspired by the new, fantastical Holdie Folk Fairies! Let’s make some magic with a cardboard box!
DIY MAGICAL CROWN:


-
01To begin

Take your cardboard and draw a zig zag line to create a crown. -
 02Cut out the pattern
Cut along the zig zag line. -
 03It's time to paint!
Try painting your crown to match your Holdie Fairy or Magical Creature! -
 04Make your holes!
When the paint is dry, poke two holes at each end of the headband – one above the other. Then poke five holes – one on each peak on the crown. -
 05Wrap the twine
Wrap each end of the twine in paper tape (this makes it easier to thread!) and thread each side. -
 06Pull together
Pull the twine through so that you have an equal amount on each side and tiie it to the right size for your real-life fairy. -
 07LETS DECORATE!
Poke flowers or leaves through the holes in the peaks. -
 08Finishing touches
Voila! You have a beautiful fairy crown – just like Bluebell!
DIY MAGICAL WAND:
Make a wish! Craft dreams really do come true!


-
 01To begin
Paint the hearts and leave to dry. -
 02Create the stick
While the hearts dry, ask an adult to cut a 0.7" split in the stick. -
 03Measure!
Measure the yarn and cut pieces 27.5" long. -
 04Create the stem
Fold the yarn in half and push it down into the split in the stick. (Try doing one piece at a time to make it easier.) -
 05Glue together
Gently lay all the yarn out flat and glue one heart to the stick. Glue all around the edges and attach the other heart on top. -
 06Leave to dry
Clamp with a peg and leave overnight to make sure the glue sticks. -
 07Finishing Touches
It’s magic! Your very own fairy wand – just like Willow’s!
DIY MAGICAL WINGS:
Twin with your fave Holdie Folk Fairy with your very own set of magical wings!


-
 01To begin
Open up the cardboard box and lie it down with the inside facing up. Measure a 8" line down the centerline -
 02Draw the wings
Draw a wing shape on one side of the line and cut around it. -
 03Fold and trace!
Now you have one wing, fold it over and trace around it. Now it’s time to cut it out so you have a full set of wings. -
 04Cut the wings
Cut out the shapes on one wing and use them as a stencil to create identical shapes on both sides -
 05Draw
Draw a teardrop shape in the top half of one wing and a love heart in the lower half. Try to leave a border of 1.5" or so around the edges. -
 06Poke the holes
Use a sharp pencil to poke holes 0.7" apart all the way around the teardrop shape. -
 07Thread the twine
Wrap each end of the twine in paper tape (this makes it easier to thread!). Working from back to front, start threading at the hole closest to the centerline, and then tie it off and tighten it at the end. -
 08IT'S PAINTING TIME !
Try painting the wings to match your Holdie Fairy or Magical Creature! Or leave them as they are and sprinkle them with bio-glitter for a magical upcycled vibe.
-
 09Make straps for the wings
Thread twine through the holes closest to the center and then tie it off. Be sure to leave enough room for your little one to be able to be able to get their arms through! -
 10Ta-dah!
Weave flowers, leaves, ribbons or whatever you fancy and ta-dah! You have magical wings... just like Willow, Bluebell and Tulip!
#olliella

 Welcome to Olli Ella!


